SpringSecurity OAuth2 自定义用户密码登陆返回 Token
前言
学习 SpringSecurity OAuth2 时就一直有个疑问,AuthorizationServerConfigurerAdapter 和 WebSecurityConfigurerAdapter 这两个适配器有什么区别?它们是如何联系上的?
如何使用 SpringSecurity OAuth2 在登陆后返回一个令牌呢?
产生令牌的流程
先来看看 Spring Security Oauth 核心源码
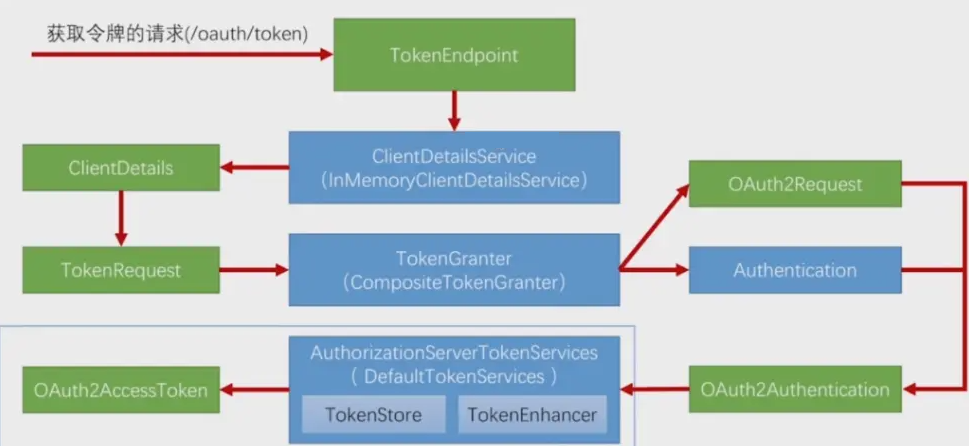
上图中:绿色方块表示实体类,蓝色方块表示接口,括号中为真正实现类。
TokenEndpoint 是程序入口点,可以理解成一个 controller,他会处理令牌请求。用授权码模式、密码模式时候,请求的 url 都是一致的,他是通过 grant_type 来告知我们使用的是哪种请求模式。
当处理 /oauth/token 请求。当收到令牌请求时候,TokenEndPoint 会调用我们的 ClientDetailsService
ClientDetailsService 区别于 UserDetailsService;UserDetailsService 是读取用户信息的,而 ClientDetailsService 用来读取第三方应用信息的。
发送请求时候在 Header 里面都会携带 clientId 和 clientSecret 来告诉是哪个应用请求授权,这个 ClientDetailsService 就会根据传过来的 clientId 和 clientSecret 读取响应的 client 配置信息。这些配置信息都会读取到 ClientDetails 这个对象里面去。
如下代码所示:
@Autowired
private ClientDetailsService clientDetailsService;

//....

// 通过 clientDetailsService 取得用户传进来的 clientId
final ClientDetails clientDetails = clientDetailsService.loadClientByClientId(clientId);

if (clientDetails == null) {

    throw new UnapprovedClientAuthenticationException(
      String.format("Given client ID [%s] does not match the authenticated client", clientId));

} else if (!passwordEncoder.matches(clientSecret, clientDetails.getClientSecret())) {

    throw new UnapprovedClientAuthenticationException(
      String.format("Given client Secret [%s] does not match the authenticated client", clientId));
}

//....
ClientDetails:这里面封装的是第三方应用的信息,然后 TokenEndpoint 还会创建一个 TokenRequest 对象。
TokenRequest:封装了我们请求的其他参数信息,比如 grant_type,如果是密码模式的话,告诉我们的用户名、密码是什么?;同时也会把 ClientDetails 信息放到 TokenRequest 里面去。因为第三方应用信息也是令牌请求一部分。
利用 TokenRequest 会去调用我们的 TokenGranter(令牌授权者)接口,这个接口后面其实封装了我们的 4种授权模式的不同实现。这个接口里面会根据你接口传上来的 grant_type 去挑选一个自己的实现去执行令牌的生成。
不管是哪种实现,生成过程中都会产生 2种东西:OAuth2Request 和 Authentication。
@Autowired
private OAuth2RequestFactory oAuth2RequestFactory;

//....

final Map<String, String> parameters = new HashMap<>();
parameters.put("username", authentication.getName());
parameters.put("password", ((UserDetails) authentication.getCredentials()).getPassword());
parameters.put("grant_type", grantType);
// parameters.put("refresh_token", userLogin.getRefreshToken());
parameters.put("scope", clientDetails.getClientSecret());

final TokenRequest tokenRequest = oAuth2RequestFactory.createTokenRequest(parameters, clientDetails);

final OAuth2Request oAuth2Request = tokenRequest.createOAuth2Request(clientDetails);
final OAuth2Authentication oAuth2Authentication = new OAuth2Authentication(oAuth2Request, authentication);
OAuth2Request 其实就是之前 ClientDetails 和 TokenRequest 信息的整合。
Authentication 接口封装了当前授权用户的一些信息。谁在做一些授权,授权用户信息就是在 Authentication 接口里面,它里面的信息是我们通过 UserDetailsService 读出来的。
OAuth2Authentication:OAuth2Request 和 Authentication 整合形成,它里面包含了现在是哪一个第三方应用在请求哪个用户在授权,然后用的授权模式是什么?授权参数是什么等?然后会传递给接口 AuthorizationServerTokenServices
AuthorizationServerTokenServices 拿到我们 OAuth2Authentication 之后,他会最终生成一个 OAuth2AccessToken 令牌。AuthorizationServerTokenServices 的默认实现类 DefaultTokenServices 里面含有两个接口的引用:TokenStore 和 TokenEnhancer
- TokenStore 用来处理令牌存储。
- TokenEnhancer 令牌生成器,当我们令牌生成之后,我们可以自定义去改造令牌。
如何自己生成令牌
在我们自己的业务场景,自己写的登录这个流程里面;我们借助于 TokenEndPoint 到 TokenGranter 是不能用的。因为发起的是获取令牌的请求,而我们是发起的登录请求。
我们要用我们自己的过滤器去处理登录请求,上面一直到 TokenGranter 这一步使用 4种方式去去生成我们的令牌。我们都是不能用的,我们需要用的就是令牌的服务产生令牌;

那么在哪里去运用上面 AuthorizationServerTokenServices 呢?是在我们的:AuthenticationSuccessHandler 里面。如下图:

@Component("myAuthenticationSuccessHandler")
public class MyAuthenticationSuccessHandler extends SavedRequestAwareAuthenticationSuccessHandler {
    private Logger logger = LoggerFactory.getLogger(getClass());

    @Autowired
    private ObjectMapper objectMapper;

    @Autowired
    private SecurityProperties securityProperties;


    @Override
    public void onAuthenticationSuccess(HttpServletRequest request, HttpServletResponse response,
                                        Authentication authentication) throws IOException, ServletException {
        /**
         * 将Authentication转换成json返回给前端
         * 参数:authentication 使用不同登录方式,其值是不一样的,这是一个接口在实际运转中,他会传不同的实现对象过来
         */
        logger.info("登录成功");

        if(LoginType.JSON.equals(securityProperties.getBrowser().getLoginType())){//JSON异步登录
            response.setContentType("application/json;charset=UTF-8");
            response.getWriter().write(objectMapper.writeValueAsString(authentication));
        }else {
            //非json就是使用父类处理器---父类处理器就是跳转
            super.onAuthenticationSuccess(request, response, authentication);
        }
    }
}
在 app 端时候,我们在登录认证成功之后,我们返回的不再是用户的认证信息,而是用 TokenServices 生成的 OAuth2AccessToken
从上一节我们知道,我们如果要生成 OAuth2AccessToken 就需要 OAuth2Authentication,而生成 OAuth2Authentication 我们又需要 OAuth2Request 和 Authentication。
之前在 Spring Security OAuth 中是根据 TokenGranter 的不同实现模式(根据传递的 grant_type)来构建生成 OAuth2Authentication 我们又需要 OAuth2Request 和 Authentication。但是在我们登录成功处理器里面的方法参数上就有一个 Authentication authentication 所以在我们的代码逻辑里面是不需要创建 Authentication 的业务逻辑的(因其在登录时候就已经创建好了),我们只需要创建处理 OAuth2Request。
OAuth2Request 的构建成了我们创建 OAuth2AccessToken 的关键。
从上一节知道我们创建 OAuth2Request 需要参数:ClientDetails 和 TokenRequest。
ClientDetails 从 ClientDetailsService 根据 ClientId 获取。ClientId 从哪里来?从我们请求参数里面 Header 的 Authorization 里面来。我们通过解析请求头中 Authorization 对应的字符串是可以拿到 ClientId 的。 TokenRequest 是根据 ClientDetails 和请求 paramaters 来 new 出一个对象的。
如下代码所示:
private String[] extractAndDecodeHeader(HttpServletRequest request) throws IOException {
    String header = request.getHeader("Authorization");

    if (header == null || !header.startsWith("Basic ")) {
        // throw new UnapprovedClientAuthenticationException("请求头中无 client 信息");
        throw new InsufficientAuthenticationException("Client authentication information is missing.");
    }

    byte[] base64Token = header.substring(6).getBytes(StandardCharsets.UTF_8);
    byte[] decoded;

    try {
        decoded = Base64.decode(base64Token);
    } catch (IllegalArgumentException e) {
        throw new BadCredentialsException("Failed to decode basic authentication token");
    }
    String token = new String(decoded, StandardCharsets.UTF_8);
    int delim = token.indexOf(":");
    if (delim == -1) {
        throw new BadCredentialsException("Invalid basic authentication token");
    }
    return new String[]{token.substring(0, delim), token.substring(delim + 1)};
}

// ....


// 调用上面的方法
String[] tokens = extractAndDecodeHeader(header, request);
assert tokens.length == 2;

String clientId = tokens[0];
String clientSecret = tokens[1];
使用示例
前言总结三点:
- 写代码的位置在哪? 在我们的 MyAuthenticationSuccessHandler 的 onAuthenticationSuccess 里面。
- 最终目标是什么? 最终目标是构建出 OAuth2Request 进而构建出 OAuth2AccessToken
- 入手源头在哪?入手源头是从请求参数里面获取 clientId。
解析请求头里面的 clientId
参考 Spring Security OAuth2 我们知道,我们使用 BasicAuthenticationFilter 解析

MyAuthenticationSuccessHandler 代码
@Component("myAuthenticationSuccessHandler")
public class MyAuthenticationSuccessHandler extends SavedRequestAwareAuthenticationSuccessHandler {
    private Logger logger = LoggerFactory.getLogger(getClass());

    @Autowired
    private ObjectMapper objectMapper;

    @Autowired
    private ClientDetailsService clientDetailsService;

    @Autowired
    private AuthorizationServerTokenServices authorizationServerTokenServices;


    @Override
    public void onAuthenticationSuccess(HttpServletRequest request, HttpServletResponse response,
                                        Authentication authentication) throws IOException, ServletException {
        /**
         * 将Authentication转换成json返回给前端
         * 参数:authentication 使用不同登录方式,其值是不一样的,这是一个接口在实际运转中,他会传不同的实现对象过来
         */
        logger.info("登录成功");

        //1.解析clientId
        String header = request.getHeader("Authorization");
        if (header == null && !header.startsWith("Basic ")) {
            throw new UnapprovedClientAuthenticationException("请求头中无clientId信息");
        }

        String[] tokens = extractAndDecodeHeader(header, request);
        assert tokens.length == 2;
        String clientId = tokens[0];
        String clientSecret = tokens[1];


        //2.获取ClientDetails并作校验
        ClientDetails clientDetails = clientDetailsService.loadClientByClientId(clientId);
        if(null == clientDetails){//说明我们根据配置的yxm拿不到第三方ClientDetails信息。我们应该抛出异常
          throw new UnapprovedClientAuthenticationException("clientId对应的配置信息不存在:"+clientId);
        }else if(!StringUtils.equals(clientDetails.getClientSecret(),clientSecret)){//如果clientDetails存在,我们就应该校验clientSeret
            throw new UnapprovedClientAuthenticationException("clientSecret不匹配:"+clientSecret);
        }

        //3.获取TokenRequest:第一个参数map主要是为了创建Authentication;但是上面Authentication已经创建。我们可以将其设置为空
        //因为grantType为:授权类型 之前是:password、authentication_code、implit、Client Credential、我们这里为自定义模式
        /**
         * 类:ResourceOwnerPasswordTokenGranter
         *
         * protected OAuth2Authentication getOAuth2Authentication(ClientDetails client, TokenRequest tokenRequest) {
         *         Map<String, String> parameters = new LinkedHashMap(tokenRequest.getRequestParameters());
         *         String username = (String)parameters.get("username");
         *         String password = (String)parameters.get("password");
         *         parameters.remove("password");
         *         Authentication userAuth = new UsernamePasswordAuthenticationToken(username, password);
         * }
         */
        TokenRequest tokenRequest = new TokenRequest(MapUtils.EMPTY_MAP,clientId, clientDetails.getScope(), "custom");

        //4.创建OAuth2Request
        OAuth2Request oAuth2Request = tokenRequest.createOAuth2Request(clientDetails);
        //5.创建OAuth2Authentication
        OAuth2Authentication oAuth2Authentication = new OAuth2Authentication(oAuth2Request, authentication);
        OAuth2AccessToken accessToken = authorizationServerTokenServices.createAccessToken(oAuth2Authentication);

        //6.响应返回
        response.setContentType("application/json;charset=UTF-8");
        response.getWriter().write(objectMapper.writeValueAsString(accessToken));
    }

    private String[] extractAndDecodeHeader(String header, HttpServletRequest request) throws IOException {
        byte[] base64Token = header.substring(6).getBytes("UTF-8");
        byte[] decoded;
        try {
            decoded = Base64.decode(base64Token);
        } catch (IllegalArgumentException var7) {
            throw new BadCredentialsException("Failed to decode basic authentication token");
        }

        String token = new String(decoded, "UTF-8");
        int delim = token.indexOf(":");
        if (delim == -1) {
            throw new BadCredentialsException("Invalid basic authentication token");
        } else {
            return new String[]{token.substring(0, delim), token.substring(delim + 1)};
        }
    }
}
安全配置
有了上面其实还是不够的,资源服务器目前只是用了 Spring Security Oauth2 的默认配置。写 spring-security-web 项目的时候的安全配置 WebSecurityConfig 主配置类中,所有的配置都是在 configure 里面的。
现在同理我们也需要一个配置,也就是注解 @EnableResourceServer 修饰的类。
@Configuration
@EnableResourceServer
public class MyResourceServerConfig extends ResourceServerConfigurerAdapter {

    @Autowired
    private MyAuthenticationSuccessHandler myAuthenticationSuccessHandler;
    @Autowired
    private MyAuthenticationFailureHandler myAuthenticationFailureHandler;
    @Autowired
    private SmsCodeAuthenticationSecurityConfig smsCodeAuthenticationSecurityConfig; //短信验证码授权配置
    @Autowired
    private SpringSocialConfigurer mySocialSecurityConfig;
    @Autowired
    private SecurityProperties securityProperties;


    @Override
    public void configure(HttpSecurity http) throws Exception {
        http.formLogin()
                .loginPage(SecurityConstants.DEFAULT_UNAUTHENTICATION_URL)
                .loginProcessingUrl(SecurityConstants.DEFAULT_LOGIN_PROCESSING_URL_FORM)
                .successHandler(myAuthenticationSuccessHandler)
                .failureHandler(myAuthenticationFailureHandler);

        http.apply(smsCodeAuthenticationSecurityConfig)
                .and()
                .apply(mySocialSecurityConfig)//配置第三方social
                .and()
                .authorizeRequests()
                .antMatchers(
                        SecurityConstants.DEFAULT_UNAUTHENTICATION_URL,
                        SecurityConstants.DEFAULT_LOGIN_PROCESSING_URL_MOBILE,
                        securityProperties.getBrowser().getLoginPage(),
                        SecurityConstants.DEFAULT_VALIDATE_CODE_URL_PREFIX+"/*",
                        securityProperties.getBrowser().getSignUpUrl())
                .permitAll()
                .anyRequest()
                .authenticated()
                .and()
                .csrf().disable();
    }
}